Friday, August 21, 2009

flying

i'm doing a lot of traveling this month and next, which means posting here will be sporadic for a bit longer.

this picture captures the best parts of traveling, the lightness and freedom, at least that's what i am thinking now through the fog of some of the most extreme and complex jet lag i've ever experienced.

it's a photo by tricia mckeller, and part of the back to school market up right now at poppytalk handmade.

Tuesday, August 11, 2009

woven felt flower girl basket

i'm off to seattle for a wedding, and here is the flower girl basket i made for it!

this is the same design as the felt basket that i made for the felt vegetables in a previous post. here's how to make one of your own.

cut 9 strips of felt, 50cm long, and 4cm wide. of course you can alter these dimensions, these are just the ones i used, which work well for a square basket 3 strips wide in each directions. 6 strips make the bottom of the basket, and become the sides. 3 more strips are woven around the sides. you'll need another 50cm by 12cm strip for the handle.

lay out 3 vertical strips, and weave 3 horizontal strips. here's the 1st one.

the 2nd one

all 3.
baste around the edges, after pulling the strips tightly together. this is just to hold them together as you move on to the next part.

take a new strip and start weaving around the side.

when it goes all the way around, overlap the ends, pull them snug, and baste them together.

repeat with a 2nd strip woven around the sides.

for the 3rd strip, cut it in half lengthwise. this actually means you have 4 strips total, 2 wide ones and 2 narrow ones. weave the narrow ones around the side of the basket, and baste the ends as before.
fold each verticle strip coming up the side of the basket (these are the same strips that started out as the bottom of the basket) over the edge. fold it over TWO of the horizontal strips (i.e. fold it over BOTH the narrow strips, and then tuck in the end under the wide horizonal strip. that means that half of you side strips will be folded inside the basket, and half outside the basket. they will stick out the other side of the wide strip after you tuck them through it, this is fine, we will trim them later.

this is the basket with all the side strips foldeded over the edge and tucked in.

next we make the handle. i used a 50cm by 12 sm wide strip, which i folded over itself in 3rds and sewed together (to make a handle that has 3 layers). this was pretty sturdy even with the felt i was using, which was quite thin. for the felt veggie basket from the previous post, i used 2 layers sewn together, which worked fine, but since this basket is actually going to be carried by a little girl in a ceremony, i wanted the handle to be pretty sturdy and hold it's shape.

i wove the handle into the basket, doubling it up with the middle side strips. i chose to put the handles on the two sides where the handle is OUTSIDE the basket at the top row. is this picture, the handle is sticking out a little at the bottom of the basket, this is just to show you that you insert the handle piece all the way down the side. then pull it even so that the end of the handle lines up with the edge of the side/bottom of the basket. and baste this end.

the handle inserted on both sides.

next, sew the edges of the felt together, while making any adjustments to make the basket more even or the woven strips more tight an consistent. remove the basting stitches.

for this basket, i sewed around all the edges on the outside of the basket only. the order that worked best for me was: sew the 4 corners of the basket, in the vertical direction. then sew the other verticle edges (2 on each side). then trim off the ends that we wove in earlier. then sew the 2 horizonal edges all the way around the basket.

ta-da!

Sunday, August 09, 2009

felt food follow up

here's the rest of my felt vegetables!

they were so fun to make...i blogged about beginning this project here.

all from this book: cute fruit and vegetables made of felt; more info here.

i wove a felt basket for them. i will post a tutorial for how to make the basket later this week, when i am making one for a different project...

i finished these last month, for a gift, and seeing these photos again makes me want to make even more!

Thursday, August 06, 2009

discoveries

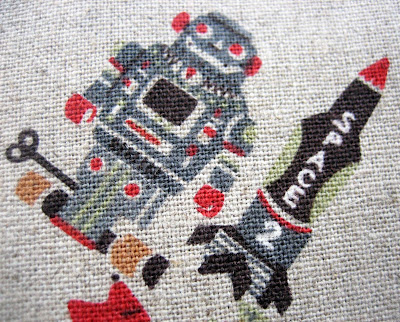
i discovered a number of things this week, including new fabric! who doesn't like robots?

there's a lot of cuteness in japan by way of scandinavia, a great trend i fully support.

i found this adorable print from the 'rabbits and racecars' series by heather ross for kokka,

and cotton canvas with baby goats. eeeek, so cute!! oh, and the fabric is finally all in my shop.

i discovered a complete post office inside a department store (kyoto takashimaya, 7th floor, along with other things you expect to find in japanese department stores, like a museum, a whole bunch of restaurants, etc.)

i also discovered that there is a bus from my street directly to one of the main shopping areas of kyoto, very close to my favorite shop (muji, of course!). this is a bit mysterious, because the bus doesn't show up on the tourist bus map i have, but i know it's real, since i've taken it several times (and i missed it this morning). i feel a bit like it's my own cat bus from the movie totoro–which is a bus that goes where you want to go, in my case either towards muji or towards my home, most often.

Wednesday, August 05, 2009

new prints from janice jong


one of my favorite illustrators, janice jong, has more new designs up in her shop!

Monday, August 03, 2009

wee easy stuffed animals project, fabric crayons

this is one of the projects i was working on last month: tiny stuffed animals.
they are super easy to make, i used a cute cotton ed emberly print, and just sewed around the animals.
i made a simple background cloth with fabric crayons.
here's how to make them.

i used 1 piece of print fabric with animals on it, and one piece of plain white fabric for the back. if you are using a print where you have animals facing both directions, you could match them up and make a reversible project-mine only have an animal on one side.

put the 2 fabrics right sides together, and sew most of the way around each animal, leaving an opening. i found it easier to sew them all before you cut any out.
cut them out.
turn them inside out and stuff. hand sew the rest of the way around. (sorry, no photo!)
these are the fabric crayons (from muji, my favorite store). they worked great. after using these or other fabric crayons, heat set with an iron on low heat, put paper on both sides of the fabric before ironing.
fabric crayons are great for kids too! here are my little pals that i made the animals for, helping me give the fabric crayons a test run.

if you wanted to do this project with small children, they could draw the background, or you could also turn their hand drawings into little stuffed animals.

Sunday, August 02, 2009

elephants are back!

look at these adorable baby shoes by mette from erleperle (where there's also a link to the pattern if you want to try to make them yourself).

the fabric she used is the wonderful and wildly popular elephant linen/cotton print that is available in a number of different colors. and i just restocked it in my etsy shop in almost all of them!

let me tell you, it was quite wonderful to visit the fabric shop again after being out of commission for a month with a broken foot. i'm still using crutches, but at least i can walk around using two shoes. i came dangerously close to buying more fabric than i could carry home, which i still have to photograph for an update later this week.