

Showing posts with label christmas. Show all posts
Showing posts with label christmas. Show all posts
Saturday, December 25, 2010
merry (portable) christmas


Thursday, December 23, 2010
amigurumi santas and snowmen
 from mochimochi land, the pattern for these are free with purchase until jan 2!
Tuesday, December 21, 2010
make your own cornstarch ornaments
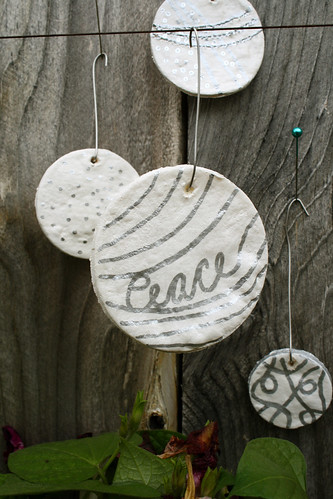
when i saw these in the flickr stream of jek in the box, they jumped out at me for their clear design and simple message.
after a few days looking at the pretty intense aftermath of a volcano (part of my research at the university), i was feeling ready for something just simple and sweet.
and the bonus is that these are actually made of cornstarch, and you can make your own with the recipe in the link!
Thursday, December 16, 2010
3D snowflakes
 there's a tutorial for how to make these great 3D paper snowflakes here, on the blog of weaver girl guz. it's actually the same process as the felt ogee ornaments from betz white that i posted yesterday-just make 6 of them and glue them together!
i made these during my english chatting class tonight, i didn't have time to properly prepare english instructions, but i had a great time making them, and i want to make more!
Wednesday, December 15, 2010
felt ornaments
 felt mistletoe cluster from ohdedoe,
 and a few felt ornaments from the whip up roundup: stars from the purl bee,
 and the felt ogee from betz white.
and i'm so flattered that my felt candy cane tutorial was also included! thanks, whip up.
Friday, December 03, 2010
felt ball ornaments
 these are some felt ball ornaments that i made a few years ago. they were very easy to make, and turned out pretty much exactly the way i imagined them (which does not always happen!).
 they are solid wool balls, made by hand with the finishing step of throwing them in the dryer, which makes them firm up and become very dense with a uniform surface. sadly, i have no dryer here in japan, so i haven't made these for the last few years. after the wool ball is made (and you can use any wool for the core, a cheaper wool or a color you want to get rid of), i used needle felting to apply the motif. which is super super easy--using a felting needle to needlefelt onto a solid felt ball is a very straightforward technique!
 i don't have a tutoral for these, but there is a good basic video tutorial that i referred to when i first tried making large felt balls is here, from the crunchy parent on youtube.
felt ornaments with tutorials
 here are a few of my handmade felt ornaments from years back, stockings...
 and candy canes! the candy canes are an especially easy project for your very first time making felt. they are wrapped around a pipe cleaner and then felted by hand. super fast, great for kids.
tutorials for both of these project are in the archives, stockings here and candy canes here, and they are also linked to over there on the right in the tutorial list!
Wednesday, December 01, 2010
christmas trees at ikea

last month I made a trip to ikea to get all the cookware and other things to make thanksgiving dinner.
it's the first year I've seen them selling christmas trees, little live ones that 'flat pack' (are tied up so that they are basically just 1 stick). and, if you bring your tree back after christmas, they will give you a voucher for the cost of it.
there are a few wacky japanese 'christmas' 'traditions'; it's nice to see trees. I don't think I'm going to get one, but I'm sure this option makes many foreigners in japan happy. good job, ikea.
Monday, December 28, 2009
christmas wrap up
 my finished sashiko ornaments!
 white and green sashiko thread on navy linen,
 with paper ornament garlands
 and some gingerbread cookies, using this recipe that was very easy, and fun.
Friday, December 25, 2009
merry christmas
 i first learned about this image transfer technique years ago in college, and this is a great tutorial on poppytalk.
i spent most of today baking cookies: russian tea cakes, a new gingerbread recipe, and my first time to attempt christmas stollen. i realized later that i forgot to take any photos! i'll try to make up for it next time, and let you know the verdict on the stollen after it has a chance to cool.
merry christmas! i hope you are enjoying today with the people you love.
Thursday, December 24, 2009
tra la la la laa, la la la la

Thursday, December 17, 2009
lego and muji
 here's a sneak peek of the new lego sets from muji, which are a brilliant combination of paper and legos. the sets include lego blocks, and paper patterns that you can cut out and use as is, and more paper that is pre-punched to fit the lego blocks.
 the standard set
 includes paper dolls,
 and this wonderful dragon. at the top of this picture is the special punch (sold separately, and on back order right now) that includes a template and is easy to see exactly where you are punching, and of course the holes are the exact size to fit legos!
 there are these animals and caterpillers too.
 here's what's included in the christmas set: legos, and pattern paper, and plain paper.
 these little card stands are clever.
 and these christmas patterns are what i want to try this weekend!
i'm planning to have these in the shop soon, but if you want more info or to get on the pre-order list, just let me know at feltcafe@gmail.com. the punches are on back order since they've been very popular here for christmas, but i should have a few this weekend, which can ship by EMS in time for chistmas.
Friday, December 04, 2009

Tuesday, December 01, 2009
december and advent calendars
 very clever match box advent calendar from sweet paul, via whip up
 from crafty nest
 whip up also has a collection of the top 30 advent calendars
and there's a craft crowy round up too.
Sunday, November 29, 2009
gingerbread ornaments from inklore
 i'm loving these gingerbread house designs printed by sam of inklore. not only are they available as ornaments, but be sure to visit her shop to see them on tea towels and reusable linen gift bags. and there's a free shipping sale at inklore through monday!
Saturday, November 28, 2009
a few holiday flickr favorites
 felt gingerbread ornament from cozy memories,
 sweet dove ornaments by whimsy and charm,
 and not for sale, but lovely cross stitch by pigeon pair.
Friday, November 06, 2009
i can't fight that feeling anymore
 i can't stop thinking about christmas crafts! and the wonderful things popping up in the blogosphere don't help! these ornaments,
 and these,
 and these! are all at rare device here, which i found via poppy talk here and more ornaments here.
 there's a new ebook with ornament projects on crafypod,
 and an easy elegant ornament made from simple felt circles from zakka life via craft.
 and then today i saw this large scale advent calendar from gingerbread snowflakes, also via craft.
i promise to blog about other non-christmas-related things, but there may be more christmas crafts in the next few weeks! you can't say i didn't warn you.
Saturday, December 27, 2008
happy winter
 happy holidays and happy winter to everyone!
 i took these photos last week at the beginning of our epic snow storm in seattle.
 this is what my street looked like.
after a busy december, it's wonderful to see visiting friends and family and relax at a slightly slower pace. yummy food and a little bit of craft time, even. i hope to back to more regular blogging after the new year, and i hope that where ever you are, you are also enjoying some winter coziness!
Monday, December 01, 2008
holiday felt stocking ornaments
 i'm loving these wee holiday stocking ornaments in a group. they are in my shop, available as a single ornament or in a set of 3.
Friday, November 28, 2008
felt stocking ornament tutorial

this is a quick holiday project, perfect for someone who has tried a little bit of felt making, and is ready to try felting around a resist. it's a very small project, but once you know how to make this stocking, you can make the same project at a larger scale, or explore other projects that involve felting around a resist. these instructions are part of a 'how to make holiday felt kit' available in my etsy shop. feel free to use and share these instructions, but please link back here and give credit to felt cafe, thank you!
you will need a small amount of wool roving (less than 1/2 an ounce), dish soap, hot water, a waterproof working surface (tupperware, even a dinner plate works for a small project like this one), a small piece of bubble wrap to make the pattern. if you have never tried making felt before, i suggest you check out my felt 101 tutorial here; you can even download the how-to-make-felt pdf instructions for free.
 make a pattern out of bubble wrap. the pattern will also be the resist, which you will be felting around.
 lay out one layer of wool roving horizontally, as shown. try to have the ends extend past the bubble wrap resist, but not have any extra roving above or below. the key is that the roving should extend past the resist when it is perpendicular to the edge. when the roving is parallel to the edge, try not to have the roving extend past the edge.
 lay out a second layer of fiber vertically, perpendicular to the first layer.
 drizzle a little bit of dish soap and hot water over the wool. try to keep the it in the center, where the pattern is, and keep the ends of the wool dry if possible. press down on the wool, working the soap and water through the wool.
 turn it over to the other side, the patter will be on top, over 2 layers of wool.
 wrap the ends around the pattern.
 the same way that you did at the beginning, lay out 2 layers of wool on the 2nd side, the 1st horizontal and the 2nd vertical, the same as you did on the 1st side. drizzle a little dish soap.
 and hot water. press down on the wool as before.
 turn it over, and wrap the ends around.
 without turning the felt over, lay out another layer of wool horizontally. (this is the 3rd layer on the 1st side.) press down on the wool, and turn it over.
 wrap the ends around.
 lay out another horizontal layer or wool. (this is the 3rd layer of wool on the 2nd side).
 turn the felt over, and wrap the ends around. press down on the wool, rub it in small circles with your fingertips. repeat on both sides several times. hold it flat between the palms of your hands, and rub them back and forth gently. all of these things are creating friction, and causing the wool to felt, which means that the tiny scales on the wool fibers are becoming locked together.
 the felt will become soapier while you work it. continue to rub and agitate the felt until you feel that the wool fibers are joined together, and you can't easily pull them off individually.
 trim off the top of the stocking with scissors. your felt will probably have grown a little bigger than the pattern you started with, so you will likely be able to cut straight across and not cut into the pattern (in case you want to save and reuse the same pattern piece). as you cut the felt, you may see that you are cutting through some but not all layers. you need to cut through all the layers, so trim it again if you need to.
 when you cut through all the layers, you can see the bubble wrap inside.
 take the bubble wrap pattern out, and continue to rub the felt as before, this time with 1 or 2 fingers inside the stocking, and your other hand outside. this is important if you want to keep the pocket part of the stocking, otherwise it will felt together. gradually rinse out the soap, continuing to rub the felt.
 if you rinse out all the soap and you feel like the stocking is too fuzzy and not felted, you can add soap and hot water again and repeat the process of agitating the wool with your hands.
 to make the loop to hang your stocking ornament, make a partial cut about 1/4 inch from the top of the stocking, and stop about 1/4 inch away from the heel side. lift up the part the you cut, it will become the loop. add a little soap and hot water to the cut edges, and rub them a little bit so they felt.
Subscribe to:
Posts (Atom)


 Posts
Posts


