here's a handmade and reusable cloth wrapping project from arounna of bookhou on poppyalk (including a printing how-to).
 and hello sandwich has a new zine all about wrapping!
 here's a handmade and reusable cloth wrapping project from arounna of bookhou on poppyalk (including a printing how-to).and hello sandwich has a new zine all about wrapping!
 wow, how did it get to be the end of january so fast? i'm leaving tomorrow (which is in a few hours) for a week long research trip to indonesia. but i wanted to leave you with another little valentine's day craft-woven felt hearts.
 twig and thistle has been doing a 5 days of felt series, which has some great ideas, including these felt bows,
 and these projects from martha stewart.
 and here's a little knitting project for november! the pattern for this cute little turkey is available for free over on the spud and chloë blog.
 i've posted about this fabric before, but finally found a few minutes to whip up a few little projects using it.
 these were so quick to make! basically the same process as the wee stuffed animals i made last summer with ed emberley animal fabric (psst-which is in my shop now!) anyway, back to the dollies: put two right sides together, sew around the doll, leaving the bottom open. for this project, i used 2 dolls that are the same size for each. this fabric actually has 4 different sized dolls printed on it, in different colors. after sewing, trim seam allowance to 1/4 inch or 1/2 cm.
 turn right side out and topstitch around the edge.
 i did this project by hand, although of course you can use a sewing machine! if you do it by hand, i though that the top stitching made a little neater.
 stuff, and sew the seam closed at the base of the doll.
 i also tried a new project, a little wallet to hold my transit cards--i have 2 for the bus (one for kobe, one for kyoto) a train pass, and a prepaid card i use to pay for bicycle parking near the train station. and it's gotten to the point where it really helps me to keep this little collection out of my wallet where i can find them easily.
 the wallet project was easy too, but i haven't written out directions yet...
 i'm thinking about trying a similar design for all my point cards next...
 this is a detail from the project on the cover of this book:
 felt furnishings by anne kyyro quinn.
 have you noticed all the wonderful reusable lunch bag projects popping up on crafty blogs recently? this one (above) is the adorable embroidered lunch bag from the purl bee, with great step by step instructions as always.
 i am curious to try this oilcloth version, from skip to my lou.
 and along similar lines, this tyvek one from sternlab, via craft.
 i'm off to seattle for a wedding, and here is the flower girl basket i made for it!
 cut 9 strips of felt, 50cm long, and 4cm wide. of course you can alter these dimensions, these are just the ones i used, which work well for a square basket 3 strips wide in each directions. 6 strips make the bottom of the basket, and become the sides. 3 more strips are woven around the sides. you'll need another 50cm by 12cm strip for the handle.
 lay out 3 vertical strips, and weave 3 horizontal strips. here's the 1st one.
 the 2nd one
 all 3.
 baste around the edges, after pulling the strips tightly together. this is just to hold them together as you move on to the next part.
 take a new strip and start weaving around the side.
 when it goes all the way around, overlap the ends, pull them snug, and baste them together.
 repeat with a 2nd strip woven around the sides.
 for the 3rd strip, cut it in half lengthwise. this actually means you have 4 strips total, 2 wide ones and 2 narrow ones. weave the narrow ones around the side of the basket, and baste the ends as before.
 fold each verticle strip coming up the side of the basket (these are the same strips that started out as the bottom of the basket) over the edge. fold it over TWO of the horizontal strips (i.e. fold it over BOTH the narrow strips, and then tuck in the end under the wide horizonal strip. that means that half of you side strips will be folded inside the basket, and half outside the basket. they will stick out the other side of the wide strip after you tuck them through it, this is fine, we will trim them later.
 this is the basket with all the side strips foldeded over the edge and tucked in.
 next we make the handle. i used a 50cm by 12 sm wide strip, which i folded over itself in 3rds and sewed together (to make a handle that has 3 layers). this was pretty sturdy even with the felt i was using, which was quite thin. for the felt veggie basket from the previous post, i used 2 layers sewn together, which worked fine, but since this basket is actually going to be carried by a little girl in a ceremony, i wanted the handle to be pretty sturdy and hold it's shape.
 i wove the handle into the basket, doubling it up with the middle side strips. i chose to put the handles on the two sides where the handle is OUTSIDE the basket at the top row. is this picture, the handle is sticking out a little at the bottom of the basket, this is just to show you that you insert the handle piece all the way down the side. then pull it even so that the end of the handle lines up with the edge of the side/bottom of the basket. and baste this end.
 the handle inserted on both sides.
 next, sew the edges of the felt together, while making any adjustments to make the basket more even or the woven strips more tight an consistent. remove the basting stitches.
 for this basket, i sewed around all the edges on the outside of the basket only. the order that worked best for me was: sew the 4 corners of the basket, in the vertical direction. then sew the other verticle edges (2 on each side). then trim off the ends that we wove in earlier. then sew the 2 horizonal edges all the way around the basket.
 this is one of the projects i was working on last month: tiny stuffed animals.
 they are super easy to make, i used a cute cotton ed emberly print, and just sewed around the animals.
 i made a simple background cloth with fabric crayons.
 here's how to make them.
 cut them out.
 turn them inside out and stuff. hand sew the rest of the way around. (sorry, no photo!)
 these are the fabric crayons (from muji, my favorite store). they worked great. after using these or other fabric crayons, heat set with an iron on low heat, put paper on both sides of the fabric before ironing.
 fabric crayons are great for kids too! here are my little pals that i made the animals for, helping me give the fabric crayons a test run.
for everyone in the u.s., i hope you are having a nice 4th of july weekend.
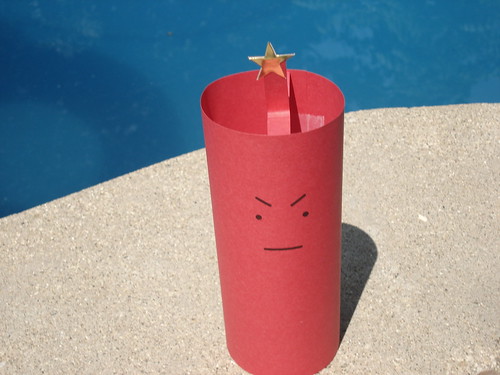
you can print out and make your own version of this firecracker decoration by using the instructions at http://wildlolive.blogspot.com. (it's under the july 2008 printables).
i don't really mind missing the 4th of july, but i do miss grilling out (as those of us from my part of the midwest call it), and backyard barbeques, potato salad, and deviled eggs.


 Posts
All Comments
Posts
All Comments